How to Prepare Soil for Planting

By: C. Colston Burrell

It's easy to take soil for granted. Many of us find a flower we want to plant, dig a hole, plop the flower in the hole, and assume it will grow. While this might work if you have excellent soil, most of us need to alter our dirt to create the most optimum growing environment.

So how do you amend soil? The first, most important step is to do a soil test to find out just what your soil is lacking -- and not lacking. Fortunately, this article will walk you through a soil test and all the steps that follow to get your soil where it needs to be. In this article, you'll find the following helpful sections:

  • About Soil

    Learn all the basics about that black, earthy stuff we call soil. You'll learn how to go about getting a soil test and what to do with the results. Whether your soil is nutrient-poor sand, heavy clay, or something in between, this section will offer suggestions on how to alter the nutrients and pH of your soil to make it as fertile as possible. Other important tests discussed in this section are texture and drainage checks that determine how well your soil absorbs and drains water.

  • Preparing Soil

    Let us suggest the best ways to amend your soil, including how to use inorganic and organic fertilizers as well as other soil-improvement methods, such as composting. You'll learn about the three main nutrients found in most chemical fertilizers -- nitrogen, phosphorous, and potassium, or N, P, K -- and how to read NPK formulas on fertilizer packaging in order to get the right combination for your soil.

    If you'd rather go the organic route, you'll also find tips on how to make your own compost and about alternative ways to improve your soil conditions without using chemicals.

  • Soil Techniques

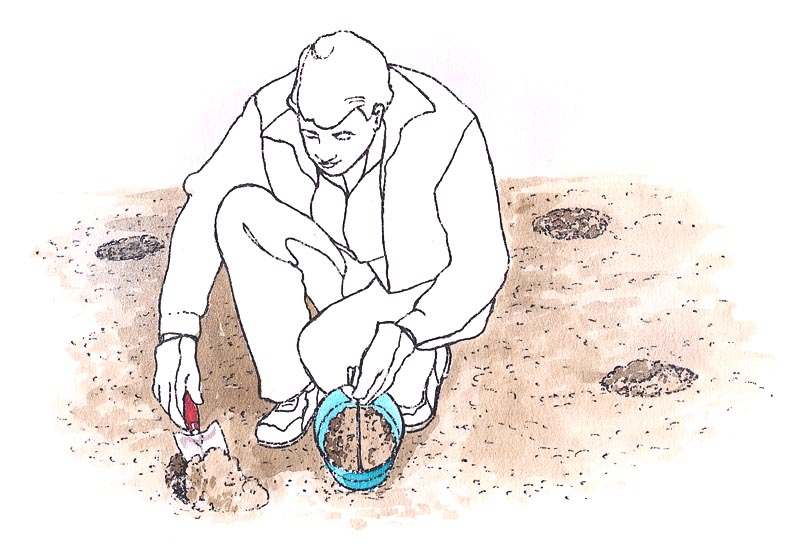
    Address the best ways to prepare your garden bed for planting, such as rototilling and hand digging. Also discussed in this helpful section are the whys and hows of installing a mowing strip around the garden bed to keep grass from growing where your flowers are.

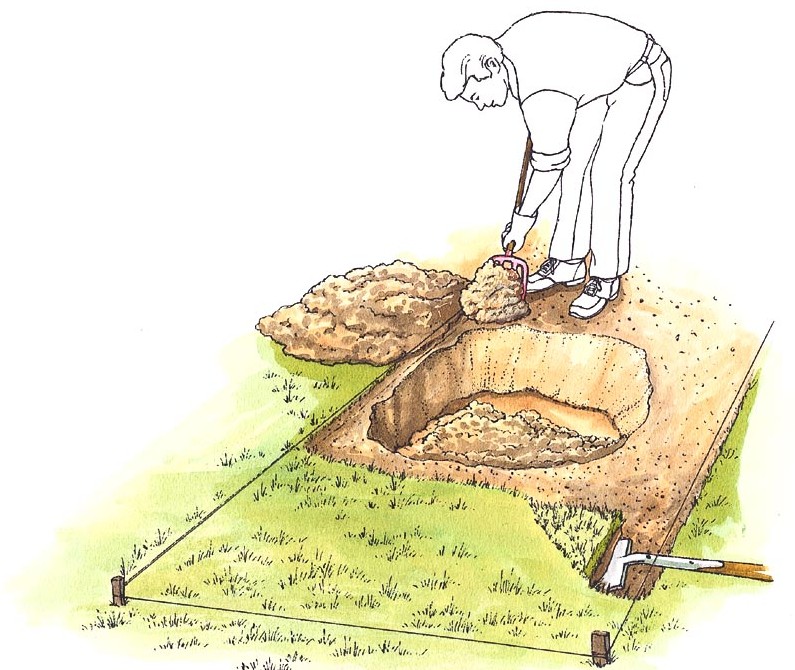
    You'll also want to turn to this section for tips on special soil techniques, such as double-digging for high-performance beds like rose garden and creating raised beds for very poor soil conditions.

  • Mulching

    Just about every garden can benefit from mulching. Not only does it help retain moisture and keep weeds at bay, it often gives a finished look to a yard or garden. This section will help ensure that you lay mulch properly (not too thick!) and that you get the look you'd like to achieve using the various types of mulch available.

So, while you may be one of the lucky one with a healthy, nutrient-rich soil, chances are you could still benefit from the many helpful tips and techniques found in this article. Don't take a chance -- get a soil test and start getting the most out of your garden soil.

Sources of Specific Nutrients

Many of these fertilizers are available processed and packaged.
  • Boron: manure, borax, chelated boron

  • Calcium: bonemeal, limestone, eggshells, wood ashes, oyster shells, chelated calcium

  • Copper: chelated copper

  • Iron: chelated iron, iron sulfate

  • Magnesium: Epsom salts, dolomitic limestone, chelated magnesium

  • Nitrogen: livestock manure (composted), bat guano, chicken manure, fish emulsion, blood meal, kelp meal, cottonseed meal

  • Phosphorus: bonemeal, rock phosphate, super phosphate

  • Potassium: granite meal, sulfate of potash, greensand, wood ashes, seabird guano, shrimp shell meal

  • Sulfur: sulfur, solubor, iron sulfate, zinc sulfate

  • Zinc: zinc sulfate, chelated zinc


Even if your soil is in tip-top shape, there are still a few things you need to do before planting your garden -- especially if you're creating a garden with high-maintenance plants. See the next section for some helpful soil techniques, such as how to double-dig a garden bed.

Advertisement

About Soil

Good soil is the first step to a great garden. The loose, dark earth of the fabulous gardens seen on television and in magazines doesn't usually just happen, however. It is created by gardeners improving their native soils.

Soil types vary from the extremes of constantly dry, nutrient-poor sand to 90 percent rocks held together with 10 percent soil to rich, heavy clay (which forms a slick, sticky, shoe-grabbing mass when wet, then dries to brick hardness). Fortunately, most soil conditions fall somewhere in between these extremes. Still, very few homeowners find they have that ideal "rich garden loam" to work with.

Soils can be amended with sand to make them looser and drier or with clay to make them moister and firmer. They can be given plentiful doses of organic material -- old leaves, ground-up twigs, rotted livestock manure, and old lawn clippings -- to improve texture and structure. Organic matter nourishes any kind of soil, which, in turn, encourages better plant growth.

Learn how to make the most out of the soil in your area by reading the tips that follow. The first step is to identify your garden conditions by having your soil tested.

Soil Testing

Have your soil tested or do your own tests to determine if you have a light and sandy soil, a moderate and productive soil, or a heavy clay soil. Get a soil test before you start adding fertilizers and amendments to your garden soil. This follows the old advice, "If it ain't broke, don't fix it." Sometimes unnecessary tampering with nutrients or soil acidity can actually create more problems than benefits.

Soil tests tell you the nutrient levels in your soil, a plant version of the nutrient guides on packaged foods. They also note pH and organic content, two factors important to overall smooth sailing from the ground up.

To obtain a good soil sample, dig down 4 to 6 inches in several different locations.
© 2006 Publications International, Ltd.
To obtain a good soil sample, dig down 4 to 6 inches in several different locations.

To have your soil tested, call your local Cooperative Extension Service, often listed under state or county government in the phone book. Ask them how to get a soil-testing kit, which contains a soil-collecting bag and instructions. Follow the directions precisely for accurate results. The results may come as a chart full of numbers, which can be a little intimidating at first. But if you look carefully for the following, you can begin to interpret these numbers:

  • If the percentage of organic matter is under 5 percent, the garden needs some extra compost.

  • Nutrients will be listed separately, possibly in parts per million. Sometimes they are also rated as available in high, medium, or low levels. If an element or two comes in on the low side, you'll want to add a fertilizer that replaces what's lacking.

  • Soil pH refers to the acidity of the soil. Ratings below 7 are acidic soils. From 6 to 7 are slightly acidic, the most fertile pH range. Above 7 is alkaline or basic soil, which can become problematic above pH 8. Excessively acidic and alkaline soils can be treated to make them more moderate and productive.

    Hand carry or mail the soil sample to the testing lab for analysis.
    © 2006 Publications International, Ltd.
    Hand carry or mail the soil sample
    to the testing lab for analysis.

Add only the nutrients your soil test says are necessary. More is not always better when it comes to plant nutrients. Don't feel compelled to add a little bit more of a fertilizer that promises great results. Too much of any one nutrient can actually produce toxic results, akin to disease or worse. Buy and apply only what's required, and save the rest of your money for a better use, like more plants.

Determining pH Levels

It is always best to choose plants that thrive in the pH of your existing soil. If you must alter the pH, follow the guidelines below.

  • Use ground limestone to raise the pH of acidic soils. Limestone is nature's soil sweetener, capable of neutralizing overly acidic soils. It's best to add limestone in the fall to allow time for it to begin to dissolve and do its job. The amount of limestone you use will vary depending on the specific soil conditions. Simple home test kits, or a professional test, can be used to determine the soil's pH. If you dump limestone on soil randomly, you run the risk of overdosing the soil. Follow the guidelines on the limestone package or on a soil test.

  • To lower the alkalinity and increase the fertility of limey and other soils with very high pH, add cottonseed meal, sulfur, pine bark, compost, or pine needles. These soil amendments gradually acidify the soil while improving its texture. Garden sulfur is a reliable cure when added as recommended in a soil test. It acidifies the soil slowly as microbes convert the sulfur to sulfuric acid and other compounds.

  • Maintaining the new and improved pH is an ongoing project. Recheck the soil's pH every year and continue to add amendments as needed.

Texture Checkup

Check the texture of your soil in a jar filled with water. This test is simple to do at home and provides important information about your soil.

Knowing the texture of your soil can help you determine which plants will grow well in your garden.
© 2006 Publications International, Ltd.
Knowing the texture of your soil can help you determine
which plants will grow well in your garden and how much care they will need.

Gather some soil from the garden, choosing a sample from near the surface and down to a depth of 8 inches. If you have dry clay, pulverize it into fine granules, and mix well. Put a 1-inch layer (a little over a cup) in a quart glass jar with 1/4 teaspoon powdered dishwasher detergent. (Dishwasher detergent won't foam up.) Add enough water to fill the jar 2/3 full. Shake the jar for a minute, turning it upside down as needed to get all the soil off the bottom, then put the jar on a counter where it can sit undisturbed.

One minute later, mark the level of settled particles on the jar with a crayon or wax pencil. This is sand. Five minutes later, mark the amount of silt that has settled out. Over the next hour or so, the clay will slowly settle out and allow you to take the final measurement. These measurements show the relative percentages of sand, silt, and clay -- the texture of your soil.

  • Soil that has a high percentage of sand (70 percent or more) tends to be well aerated, ready to plant earlier in spring. But it also tends to need more frequent watering and fertilization than heavier soils.

  • Soil that has 35 percent or more clay retains moisture well, so it takes longer to dry in spring and may need less watering in summer. It can be richer and is more likely to produce lush growth with just the addition of compost and, occasionally, a little fertilizer. The compost is important. It helps break up clay so the soil won't be too dense and poorly aerated.

  • Soil that has nearly equal percentages of sand, silt, and clay can have intermediate characteristics and is generally well suited for good gardening.

Testing Drainage

Test your soil's drainage by digging a hole, filling it with water, and watching how quickly the water disappears. All the soil tests in the world won't do a better job than this simple project. It tells you how quickly moisture moves through the soil and whether the soil is likely to be excessively dry or very soggy -- neither of which is ideal.

When it hasn't rained for a week or more and the soil is dry, dig several holes that are 1 foot deep and 2 feet wide. Fill them to the top with water and keep track of how long it takes for the holes to empty. Compare your findings to the following scale:

  • 1 to 12 minutes: The soil is sharply drained and likely to be dry.

  • 12 to 30 minutes: The soil has ideal drainage.

  • 30 minutes to 4 hours: Drainage is slow but adequate for plants that thrive in moist soil.

  • More than 4 hours: Drainage is poor and needs help.

These soil tests may seem like a lot of work without much reward, but if your soil is working at its full capacity, your plants will bloom at their best as well.

Listen to Your Weeds
Look for the tales weeds have to tell as they grow in your garden. Weeds are opportunists, taking advantage of any vacant soil to make their home. (Just think of how well this strategy has benefited the dandelion, a native of Eurasia that has swept through America.)

Although they seem to grow everywhere, dandelions prefer fertile, often heavy soil. Likewise, other weeds favor certain kinds of soil. For instance, acidic soil can encourage the growth of crabgrass, plantains, sheep sorrel, and horsetails. Alkaline soil (also called sweet or basic soil) is favored by chamomile and goosefoot. Fertile, near-neutral soils can provide a nurturing environment for redroot pigweed, chickweed, dandelions, and wild mustard.

Even if you can't tell one weed from another, you can find out important information by looking at them closely. If a vacant garden area has few weeds taking advantage of the opening, the soil is likely to need plenty of work. If weeds are growing, but only sparsely, and have short, stunted stems and discolored leaves, the area may have a nutrient deficiency, and a soil test is in order. If, in newly tilled soil, weeds sprout up quickly in certain areas and more slowly in others, the weedy areas are likely to be moister and better for seed germination.

Now that you've learned everything you've ever wanted to know -- and more -- about your soil, take a look at the next page for how to prepare your soil for planting.

Advertisement

Preparing Soil

Once you know the nature of your soil, it's easy to amend it to meet the needs of the plants you want to grow. But just as the characteristics of garden soil vary, so, too, do the ways to amend and improve soil to achieve the best possible growing conditions. Fortunately, the following tips and techniques will assist you.

Fertilizers

If the results of your soil test indicate a lack of certain nutrients, you should follow the recommendations made by the testing company for supplementing the soil. If the imbalance is slight, organic fertilizers can be used.

The fruit of your labors -- a tiny seedling grows.
© 2006 Publications International, Ltd.
The fruit of your labors --
a tiny seedling grows.

Because they generally contain a low percentage of nutrients that are slowly released into the soil, organic fertilizers are inadequate when fast results are needed or if the imbalance of nutrients is great. In these situations, inorganic fertilizers are the better choice.

A combination of both kinds may be a good compromise: Use the quick-to-feed commercial plant foods first, then
follow up in subsequent years with the slow-feeding organic fertilizers.

Chemical fertilizer is commonly formulated in some combination of the three major nutrients: nitrogen, phosphorous, and potassium -- N, P, K. The numbers featured on each bag represent the percentage of each of these nutrients in the mix. For example, 5-10-5 contains 5 percent nitrogen (N), 10 percent phosphorous (P), and 5 percent potassium (K).

The NPK formula is also listed on each container of organic fertilizer. The percentages of each nutrient are lower in organic fertilizers than in inorganic fertilizers. Therefore, larger amounts of organic plant food are required to achieve the same results.

It's also possible to purchase fertilizers separately rather than in a three-nutrient mix. These are useful when there's a deficiency in a single nutrient. Consult with your Cooperative Extension office or garden center staff if you feel uncertain about solving nutrient deficiency problems.

Other Ways to Improve Soil

While fertilizers are pretty fool-proof -- and definitely convenient -- there are other ways to make your soil the best it can be. Read the following tips to find out more.

Sources of
Organic Matter
All of these work well to add much-needed nutrients to your soil:
  • Agricultural remains, such as peanut hulls, rice hulls, or ground corncobs
  • Bark chunks
  • Compost
  • Grass clippings
  • Kitchen vegetable scraps
  • Mushroom compost
  • Livestock manure
  • Peat moss
  • Salt hay
  • Seedless weeds
  • Shredded bark
  • Shredded leaves
  • Straw

  • Get local compost from your city or town hall service department. Made from leaves and grass clippings collected as a public service, the compost may be free or at least reasonably priced for local residents.

    To find other large-scale composters, check with the nearest Cooperative Extension Service; they are up-to-date on these matters. Or try landscapers and nurseries, who may compost fall leaves or stable leftovers for their customers, and bulk soil dealers, who may sell straight compost or premium topsoil blended with compost. Don't give up. Yard scraps are discouraged or banned in many American landfills, so someone near you may be composting them.

  • Plan ahead for bulky organic soil amendments -- compost, manure, and leaves -- that may be added by the wheelbarrow-load to improve the soil. This will raise the soil level, at least temporarily. As the organic
    matter decays, the soil level will lower.

  • If soils rich in organic matter drop to expose the top of
    a newly planted shrub or tree roots, add more soil or organic matter to keep the roots under cover.

  • If your garden is beside a house or fence, keep the soil level low enough so it won't come in contact with wooden siding or fencing that isn't rot-resistant.

  • When planting around existing trees, shrubs, and perennial flowers, avoid covering the crown -- where stems emerge from the ground -- with organic material. This helps prevent disease problems.

  • Till or spade a thick layer of compost into lightly moist (never wet) soil to bring it to life before planting a new garden. If you are starting with hard, compacted soil, it's necessary to spade the soil first to break it up. Go over the area, removing weed roots and other unwanted vegetation as you go. Then go over the soil with a rototiller. After the first pass, go over it again crosswise until you break the soil into reasonably small pieces.

    Your well-tilled soil, like screened topsoil, may look great at first, but silt or clay soils are likely to get stiff, crusty, and hard after a few heavy downpours. The best way to keep soil loose and light is to add organic matter.

    Add a 4- to 6-inch-deep layer (more if soil is very poor) of compost to the soil and work it down until it's 10 to 12 inches deep. The soil will become darker, moister, and spongier -- a dramatic conversion right before your eyes. As long as the organic matter remains in the soil, the soil is likely to stay loose. But since it slowly decays, you will have to continue to add organic matter -- compost, mulch, or shredded leaves -- to maintain the desired texture.

  • Try spading or no-till systems to preserve the texture and organic content of thriving garden soils. Once the soil is loose, light, and rich, minimal disturbance helps preserve the levels of organic matter. Avoid repeated tilling, which breaks healthy soil clumps and speeds up decay.Instead of tilling, loosen rich soil before planting by turning the surface shallowly with a shovel and breaking it apart with a smack from the shovel backside. Very loose soil can be made ready for direct seeding by combing it with a hoe or cultivator.

To check your soil texture quickly, simply squeeze some lightly moist soil in your hand.
© 2006 Publications International, Ltd.
To check your soil texture quickly, squeeze some lightly moist soil in your hand.

Most important, be sure to test your soil by feel before and after it is amended to judge the extent of the change. Take a small handful of lightly moist soil from several inches below the soil surface. Squeeze it into a ball in your hand and watch the results when you extend your fingers.

Sandy soils, which can have a scratchy feel, will fall apart. To enrich a sandy soil, apply and incorporate a several-inch layer of compost and even an inch or two of clay, then try again. When the soil is improved, the ball will cling together better.

Clay soils, which have a slick feel, will form a tight ball that's not easily broken up. To lighten clay soil, add extra compost and coarse sand. When the soil is light enough, the ball will break up with a tap of a finger.

Advertisement

Soil Techniques

If you're planning to fill your garden bed with roses, you may need some special soil techniques in your arsenal in order to create the garden oasis you've always dreamed of. Luckily, the tips that follow will make you an expert on soil prep in no time.

Preparing a Garden Bed

To properly prepare a planting bed, mark the flower bed boundaries with pegs and string for straight edges and with a garden hose for curved lines. Cut through the sod along laid-out lines with a spade. Remove the sod from the entire bed. If the area is rocky, remove as many stones as possible as you dig.

If the soil is sandy or loamy, you may be able to rototill the soil rather than hand turning it. Clay and rocky soils require hand digging first. For a small planting area, dig and break up the soil by hand or with a spade.

After the soil is turned, rototilling will be possible. (Rototillers can be rented by the day, and it's often possible to hire someone to come and till by the hour, if you don't have a tiller of your own.)

Use pegs and string to make the boundaries of your flower bed.
© 2006 Publications International, Ltd.
Use pegs and string to make the boundaries of your flower bed.

Next, spread the necessary fertilizer, soil conditioners, and pH-adjusting chemicals over the area. Tilling is easy once the soil is turned. You should be able to till more deeply the second time; ideally, you want to loosen and improve the soil to a depth of more than 6 inches.

Turn and loosen soil by hand with a spade where the area is too small to require a rototiller. After this initial treatment, fertilizers, soil conditioners, and pH-adjusting chemicals will be added at different times of the year for best results.

Now is the perfect time to install some kind of mowing strip around the garden bed. Patio squares or slate pieces laid end-to-end at ground level will keep grass and flowers from inter mixing. Other options include landscape logs, poured concrete strips, or bricks laid side-by-side on a sand or concrete base. The mowing strip must be deep and wide enough so grass roots cannot tunnel underneath or travel across the top to reach the flower bed, and the top of the strip must not extend above the level of the adjacent lawn.

If possible, allow the soil to stand unplanted for a week or more. Stir the surface 1 or 2 inches every three to four days with a scuffle hoe or cultivator to eradicate fast-germinating weeds. This will make your weeding chores lighter during the rest of the season.

Double-Digging

Double-digging garden beds to make high-performance gardens for deep-rooted plants such as roses and perennials is a tradition in many beautiful British gardens. The average rototiller works the soil only 8 or 10 inches deep and won't break up compacted soil below. Double-digging will.

Double-dig a garden bed intended for deep-rooted plants such as roses.
© 2006 Publications International, Ltd.
Double-dig a garden bed intended
for deep-rooted plants like roses.

Double-digging requires a bit of a stiff upper lip because it
takes a lot of manual labor. Do a little at a time so you don't overdo it, or hire a professional landscaper if you have health restrictions.

Start with vacant soil that is stripped of grass and other vegetation. Beginning at one end of the garden, remove a strip of soil a spade's length deep and a spade's width wide. Put it
in a wheelbarrow. Use your shovel to turn the soil below it (likely to be one of the heaviest parts of the job) and break it
up.

Another (sometimes easier) option is to jab a garden fork (like
a big pitchfork) into the hard lower soil and rock it around until the soil breaks up. If organic matter is needed, you should add it to the lower level at this point.

Do the same thing to the second strip of soil next to the first row. But turn the surface topsoil into the first trench, adding organic matter as desired. Then loosen and amend the exposed subsurface soil. Continue filling each trench from the adjacent row and loosening the soil below. Fill the final strip with the soil from the wheelbarrow.

Raised Beds

Time-Saving Tip
Pile dug-out earth on a tarp instead of on the grass when digging a hole for planting or excavating a garden pool. You can easily drag away any excess soil, and you won't have to rake up little clods trapped in the turf. Don't waste that soil. You can use it to build a waterfall beside the pool or to fill a raised bed for herbs or vegetables.

Raised beds are a good choice where soil is either of particularly poor quality or nonexistent. Constructed of pressure-treated wood, reinforced concrete, or mortared brick, stone, or blocks, these beds can be of any length, but should have a soil depth of at least 6 inches to allow good root penetration.

By filling some beds with a rich loam mixture and others with a sandier, well-drained mix, it's possible to provide the ideal soil requirements for a wide range of plants. This may seem a
costly solution in the short term, but the beds will last for years and prove well worth your initial investment.

In vegetable gardens, simply mound up planting rows 6 to 8 inches high and 2 to 3 feet wide. (You can walk in the paths beside the planting rows without compressing the raised soil.) Set permanent and decorative gardens in handsome raised-bed frames built of timbers, logs, rocks, or bricks, which can vary from 4 inches to 4 feet high. Don't hesitate to ask for professional help with big building projects, which need strong structures if you want them to last.

If using pressure-treated wood, do not grow herbs or vegetables in your raised beds, as toxins may be present.

A raised bed garden is a good alternative where the soil isn't usable.
© 2006 Publications International, Ltd.
A raised bed garden is a good alternative where the soil isn't usable.

No matter what type of garden bed you're planting, adding mulch is not only a nice decorative element but is also great for keeping weeds out and moisture in. See the next page for tips.

Advertisement

Mulching

Adding mulch to your garden will improve the overall health of the soil and beautify the appearance of your landscaping. Mulching is relatively easy, but there are some tips to create the look your going for as well as provide the coverage you need to help your plants grow.
  • Cover garden beds with a layer of mulch to keep weeds down and reduce the need for water. Annual weed seeds are less likely to sprout when the soil is covered with enough mulch to keep the soil surface in the dark.

  • When it comes to water, even a thin layer of mulch -- nature's moisturizer -- will reduce evaporation from the soil surface. Thicker mulches can reduce water use by as much as 50 percent.

  • For a soothing, natural-looking garden, use dark-colored organic mulches made of bark or compost. For a brilliant-looking garden, consider a mulch of bright gravel. In utilitarian gardens such as vegetable gardens, straw makes an excellent mulch. Avoid colored mulch or beauty bark.

  • For maximum effectiveness with only a thin mulch layer, look for fine-textured mulches such as twice-shredded bark, compost, or cocoa hulls. For an airy mulch, try thicker layers of coarse-textured mulches such as straw or bark chunks. Don't apply fine-textured mulches, like grass clippings, in thick layers that can mat down and smother the soil.

    Twice-shredded bark provides a fine texture to the garden bed.
    © 2006 Publications International, Ltd.
    Twice-shredded bark provides a fine texture to the garden bed.

  • Kill off sod or dense weeds by layering newspaper, alone or with a thick layer of compost or mulch, directly on the garden site. This treatment cuts off the sunlight to unwanted vegetation, which will eventually decay and add organic matter to the garden. The newspaper decomposes, too. (What a bargain!)

  • Woody mulch, such as shredded bark, uses nitrogen as it decays. Apply extra nitrogen to prevent the decay process from consuming soil nitrogen that plants need for growth.

  • Mulch new plants with straw or chopped leaves after planting in the fall to prevent root damage during winter. A little mulch used immediately after planting can help to keep the soil moist and encourage continued root growth.

  • Add a thick layer of mulch and let it rot to improve the soil of existing gardens. Minerals, released as the mulch is degraded into nutrient soup, soak down into the soil and fertilize existing plants. Humic acid, another product of decay, clumps together small particles of clay to make a lighter soil.

  • The main reason to mulch lies ahead, in winter. Alternately freezing and thawing, expanding and contracting soil can break new roots or even push new plantings out of the ground, a process called frost heaving. By mulching generously with an airy material like straw when the soil first freezes, you can help keep the soil frozen until winter ends, at which point the mulch can be removed.

    In winter, mulch evergreen perennials and ground covers with evergreen boughs to protect them from winter burn (the cold-weather opposite of sunburn). When the soil is frozen, the wind is strong, and the sun is bright, moisture is pulled out of the vulnerable leaves and cannot be replaced by the frozen roots. A protective layer of evergreen boughs, possibly obtained by recycling the branches of a Christmas tree, forms a protective shield over vulnerable greenery. Straw will also do the job, especially in colder areas where there is less chance of rot in winter.

  • Celebrate if you live in a snowy area. Snow is the best mulch of all, and it may allow you to grow plants that won't survive winter in snowless areas farther south.

Don't let difficult soil get you down. With a little hard work -- and the proper soil amendments -- you, too, can have a garden bursting with your favorite flowers.

©Publications International, Ltd.

Advertisement

Advertisement

Loading...